Thursday, May 17, 2012

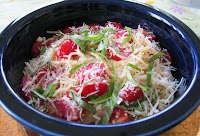
Quick & Easy: Chicken Berry Salad

Another warm day of bread baking means something cool and refreshing for dinner.  Here's another great salad to add to the repertoire!

Serves - 6
Preparation Time: 20 minutes

8 cups torn salad greens (used 10oz pkg fresh spring mix)
1 pound boneless skinless chicken breasts, cooked, cut into strips (used shredded chicken)
2 cups fresh berries (raspberries, blueberries, sliced strawberries)
1 pkg (8oz) frozen sugar snap peas, thawed (omitted)
1/4 cup chopped toasted pecans
1 cup prepared GOOD SEASONS Italian Dressing Mix (prepared with less oil version as directed on package)

1.  Toss greens with all remaining ingredients except dressing in large bowl.

2.  Add dressing just before serving; mix lightly.

Exchange/Carbs: 1/2 fruit / 1 vegetable / 2 lean meat / 2-1/2 fat / 1 carb choice
Calories - 250                   Sodium - 480mg
Total Fat - 15g                  Total Carbs - 12g  w/net Carbs - 8g
   Saturated Fat - 2g               Dietary Fiber - 4g
Cholesterol - 45mg                Sugar - 5g
 Protein - 19g

Source: www.kraftrecipes.com/recipes/chicken-berry-salad

Review/Suggestions:

  • Raspberries too expensive, so just went with blueberries & strawberries.
  • Even though I had a package of frozen sugar snap peas, fresh sounded better.  Unfortunately, they didn't look so good at the store, so skipped them this time.
  • Decided to go with Ken's Light Raspberry Walnut Vinaigrette dressing instead.  Even though I read reviews that said the Italian dressing and the other flavors all worked well together, I'm happy to just stay with the raspberry walnut vinaigrette.

Tuesday, May 15, 2012

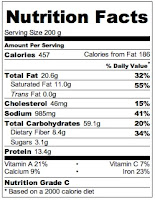
Quick & Easy: Summer Garden Pasta

Just the right light dish for a warm day!  Now don't despair when it says Inactive Prep Time is 4 hrs.  Since I was trying to decide what to fix this evening, I cut the inactive prep time to about 20 minutes (yes, it was only as long as it took for the water to boil and cook the pasta).  I'm sure the flavors would meld together nicely after 4 hours, but it was still a hit this evening!

Serves - 6
Preparation Time: 15 minutes
Inactive Preparation Time: 4 hr
Cook Time: 5 minutes

4 pints cherry tomatoes, halved (used grape tomatoes)
good olive oil
2 Tblspn minced garlic (6 cloves)
18 large basil leaves, julienned, plus extra for serving
1/2 tsp crushed red pepper flakes
Kosher salt
1/2 tsp freshly ground black pepper
1 pound dried angel hair pasta
1-1/2 cups freshly grated Parmesan cheese, plus extra for serving (used fresh grated Romano)

1.  Combine the cherry tomatoes, 1/2 cup olive oil, garlic, basil leaves, red pepper flakes, 1 tsp salt, and the pepper in a large bowl.  Cover with plastic wrap, and set aside at room temperature for about 4 hours.

2.  Just before you're ready to serve, bring a large pot of water with a splash of olive oil and 2 Tblspn salt to a boil and add the pasta.  Cook al dente according to the directions on the package (be careful - it only takes 2 to 3 minutes!).  Drain the pasta well and add to the bowl with the cherry tomatoes.  Add the cheese and some extra fresh basil leaves and toss well.  Serve in big bowls with extra cheese on each serving.


Note: though total carbs for Dreamfields Pasta is 41g, after you subtract the Dietary Fiber & protected (non-digestible carbs), the digestible carbs is only 5g.


Source: 2006, Barefoot Contessa at Home

Review/Suggestions:

  • Though cherry tomatoes are sweeter, I like the firmness of grape tomatoes when cooking
  • The romano cheese definitely added a nice change in flavor
  • Because it had been so warm in the house due to bread baking earlier in the day, I really wanted a nice cool dish.  So by only letting the tomato mixture sit out for a shorter period of time, the mixture was still cool.  I also rinsed the pasta with cool water.  The taste - cool, light and refreshing.


Wednesday, May 9, 2012

Quick & Easy: Breaded Pork Medallions with Cranberry Onion Chutney

You have to try it to really appreciate the flavors!

Serves - 8 / Serving Size - 2 medallions
Preparation Time: 15 minutes
Cooking Time: 10 minutes

Cranberry Onion Chutney
2 tsp olive oil
1/2 medium red onion, diced
1 cup fresh cranberries
1/4 cup Splenda
1/2 cup balsamic vinegar
1/2 cup low-sugar apricot preserves

Breaded Pork Medallions
1 lb pork tenderloin, cut into 16 medallions
3 egg whites
1 tsp hot sauce
3/4 cup cornmeal
1/2 tsp garlic salt
1/2 tsp ground black pepper
2 tsp olive oil
Cooking spray

1.  Heat a medium saucepan over medium-high heat.  Add olive oil and red onion, and sauté 6-7 minutes or until ingredients begin to caramelize.  Add cranberries, Splenda, vinegar, and preserves.  Bring to a boil.  Reduce to a simmer and cook for 15 minutes or until chutney has a thick jam-like consistency.

2.  Pound pork medallions until about 1/4 inch thick.

3.  In a small bowl, whisk together egg whites and hot sauce.  In a separate bowl, stir together the cornmeal, garlic salt, and black pepper.

4.  Dip each medallion in egg mixture, then in cornmeal to coat.

5.  Heat a large sauté pan over medium-high heat.  Add olive oil and a generous amount of cooking spray to the pan.  Once the oil is hot, sauté the medallions in batches, cooking for about 2 minutes on each side.

6.  Serve chutney over the medallions.

Exchanges/Carbs: 2 lean meat / 1-1/2 carbs
Calories - 180                           Sodium - 125mg
   Calories from Fat - 35            Total Carbs - 22 g    w/ net Carbs - 20g
Total Fat - 4g                                 Dietary Fiber - 2g
   Saturated Fat - 0.8g                    Sugar - 9g
   Trans Fat - 0g                         Protein - 13g
Cholesterol - 30mg

Source: The Healthy Carb Diabetes Cookbook by Chef Jennifer Bucko, MCFE & Lara Rondinelli, RD, LDN, CDE

Review/Suggestions:

  • If you can't find fresh whole cranberries, check the frozen section.  Just make sure that they're not packed in syrup or added sugar.  Since I couldn't find them at all last year, I bought several bags during the holiday season and put them in the freezer.
  • To save time, I had boneless pork chops that were already 1/4" thick and just them into smaller pieces.
  • A little cornstarch mixed with water is my go to thickener.  Even after 25 minutes the sauce was nowhere near jam-like, so cornstarch thickener to the rescue.
  • Yes, this will definitely be made again, especially the chutney.  I've found serious competition for regular cranberry sauce with the holiday turkey or chicken.

Monday, May 7, 2012

Quick & Easy: Lemon-Herb Penne

Here's another nice light meal for those warmer days.

Serves - 6
Preparation Time: 15 minutes
Cooking Time: 10 minutes

1 box Dreamfields Penne Rigate
1/3 cup plus 2 Tblspn freshly grated parmesan cheese
2 Tblspn fresh thyme leaves
1-1/2 Tblspn olive oil
1 Tblspn chopped fresh chives
1 tsp freshly grated lemon peel
Salt and freshly ground black pepper
Fresh thyme, chives and lemon wedges (optional)

1.  Cook pasta according to package directions.  Drain and return to pan.  Add 1/3 cup of the cheese, thyme, oil, chives and lemon peel; toss to combine.  Season to taste with salt and pepper.  Serve immediately with remaining cheese.  Garnish with fresh herbs and lemon wedge, if desired.

Calories - 267                Sodium - 132mg
Total Fat - 6g                 Total Carbs - 6g* (digestible carbs)
   Saturated Fat - 2g           Dietary Fiber - 5g
Cholesterol - 7mg          Protein - 12g

Source: www.dreamfieldsfoods.com/healthy-pasta-recipes/2008/08/lemon-herb-penne.html

Review/Suggestions:
  •  As you can see, I turned this side dish into a main dish by adding shredded chicken.
  • Whether you keep this as a side or main dish,  pine nuts would be a great addition.
  • I know the lemon is suppose to be a nice light flavor, but I'd bump up the grated lemon to 2 tsp and sprinkle a little fresh lemon juice on the pasta as well.

Sunday, May 6, 2012

Quick & Easy: Cranberry Walnut Salad

Sounded good.....tasted AMAZING!

Serves - 5
Preparation Time:  10 minutes

5oz field green salad mix
1/4 cup dried cranberries
1/4 cup walnuts, chopped and toasted
1 cup shredded carrots
4 green onions, chopped
3 Tblspn balsamic vinegar
1 Tblspn olive oil
1 Tblspn Splenda [used one packet - way less than 1 Tblspn]
1/4 tsp salt (optional)
1/4 tsp ground black pepper

1.  In a large bowl, toss together the field greens, cranberries, walnuts, carrots, and green onions.

2.  In a small bowl, whisk together balsamic vinegar, olive oil, Splenda, salt (optional), and pepper.

3.  Pour dressing over the salad, toss to coat evenly and divide among five plates.


Exchange/Carb - 1/2 fruit / 1 vegetable / 1-1/2 fat
Calories - 110                        Sodium - 25mg
   Calories from Fat - 65         Total Carbs - 12g  w/net Carbs - 10g
Total Fat - 7g                              Dietary Fiber - 2g
   Saturated Fat - 0.7g                 Sugar - 8g
   Trans Fat - 0g                      Protein - 2g
Cholesterol - 0mg

Source:  The Healthy Carb Diabetes Cookbook by Chef Jennifer bucko, MCFE & Lara Rondinelli, RD, LDN, CDE

Review/Suggestions:

  • The comment after the first bite, "you can make this again, or for that matter, as often as you want!"
  • Yes, I did add shrimp.  Next time may decide to add shredded chicken.  Honestly, you could add any protein and it would still be great!
  • Paired this with the Blueberries with Lemon Cream for dessert - yum!

Thursday, May 3, 2012

Pico de gallo

Love making pico de gallo.  The colors and the taste of fresh ingredients can't be bet.

Preparation Time: 25 minutes

3 firm roma tomatoes
1/2 medium-size red onion, diced
1/4 cup fresh cilantro, diced
1 large jalapeno, diced
fresh lime juice
salt to taste

Combine all ingredients and add lime juice and salt to taste.  So the flavors can really come through, place in fridge for at least 2 hrs before serving.  But if you're in a hurry, don't worry as it's still going to taste great.


Source: My own recipe

Review/Suggestions:

  • Depending on the time of year, the jalapenos may not be very hot.  So if you really want your pico to have some kick, try adding habaneros as well.  Remember - wear gloves when preparing habaneros.

Chicken Taco Salad

The main course for my Cinco de Mayo celebration - good stuff!

Serves - 4  /  Serving Size - 1 cup filling & 2 cups salad
Preparation Time: 15 minutes
Cooking Time: 15 minutes

1/2 cup prepared salsa
1/4 cup reduced-fat sour cream
1 tsp canola oil
1 medium onion, chopped
3 cloves garlic, minced
1 pound 93%-lean ground turkey [used shredded chicken]
2 large plum tomatoes, diced
1 14-oz can kidney beans, rinsed [used black beans]
2 tsp ground cumin
2 tsp chili powder
1/4 cup chopped fresh cilantro
8 cups shredded romaine lettuce
1/2 cup shredded sharp cheddar cheese [use Mexican style grated cheese]

1.  Combine salsa and sour cream in a large bowl.

2.  Heat oil in a large non-stick skillet over medium heat.  Add onion and garlic and cook, stirring often, until softened, about 2 minutes.  Add turkey and cook, stirring often and crumbling with a wooden spoon, until cooked through, about 5 minutes.  Add tomatoes, beans, cumin and chili powder; cook, stirring, until the tomatoes begin to break down, 2 to 3 minutes.  Remove from the heat, stir in cilantro and 1/4 cup of the salsa mixture.

3.  Add lettuce to the remaining salsa mixture in the bowl; toss to coat.  To serve, divide the lettuce among 4 plates, top with the turkey mixture and sprinkle with cheese.

Exchanges/Carb: 1 starch / 2 vegetable / 4 lean meat / 1 carb serving
Calories - 447                           Sodium - 629mg
Total Fat - 19g                          Total Carbs - 27g  w/net Carbs - 17g
   Saturated Fat - 8g                       Dietary Fiber - 10g
   Monounsat Fat - 5g                Protein - 42g
Cholesterol - 108mg

Source: Eating Well http://www.eatingwell.com/recipes/taco_salad.html

Review/Suggestions:

  • Having just made salsa, I had enough to use in this recipe as well as for chips.
  • I didn't think the sharp cheddar cheese would work with the shredded chicken.  So instead used  Mexican style grated cheese.  Talk about a distinct flavor too.
  • Also added a small can of corn - yes, added color and the benefit of another veggie.
  • Definitely had leftovers of the filling.  Recommend you reheat the filling to get the most out of the flavors.

Quick & Easy: Skinny Guacamole

Honestly I was skeptical about this recipe, but after tasting I'm a believer!

Serves - 4 / Serving Size - 1/2 cup
Preparation Time: 20 minutes

1 large zucchini, cut into 1/2 inch cubes
1 large ripe avocado, cubed
1/4 cup coarsely chopped fresh cilantro
1/4 cup finely chopped onion
2 cloves garlic, minced
2 Tblspn lime juice
1/2 tsp hot sauce, such as Tabasco, or more to taste
1/4 tsp salt

1.  Place zucchini in a microwave-safe dish, cover with a damp paper towel and microwave on High until tender, 4 to 5 minutes.  Drain in a sieve, pressing lightly on the zucchini to extract any liquid.

2.  Transfer the zucchini to a large bowl; add avocado, cilantro, onion, garlic, lime juice, hot sauce and salt and coarsely mash until combined.

Exchanges/Carb: 1 vegetable / 1-1/2 fat / 1/2 carb serving
Calories - 96                         Sodium - 167mg
Total Fat - 8g                        Total Carbs - 8g  w/net Carbs - 4g
   Saturated Fat - 1g                   Dietary Fiber - 4g
   Monounsat Fat - 5g            Protein - 2g
Cholesterol - 0mg

Source: Eating Well http://www.eatingwell.com/recipes/skinny_guacamole.html

Review/Suggestions:

  • True to form, I read the directions and had all the ingredients out (or so I thought).  So next time I'll put the onion and salt in and see how it changes the flavor.  : )
  • I didn't do the whole "drain zucchini in a sieve and press lightly."  After cooking, there was absolutely no liquid.
  • Even still, I was pleasantly surprised.  You would never guess there's zucchini in this guac.

Aaron Sanchez's Mexican Brownies

[UPDATE] In celebration of Cinco de Mayo, here's a definite "kick" to the ordinary brownie!

Servings - 50 bite size brownies
Preparation Time: 20 minutes
Cooking Time: 25 minutes

2 sticks unsalted butter, plus more for greasing
2 cups sugar
4 large eggs
2 tsp vanilla extract
2/3 cup good-quality unsweetened cocoa powder [used Dutch-processed]
1 cup all-purpose flour
1 tsp ground Mexican cinnamon (canela)
1/4 tsp pequen chili powder or cayenne pepper [used 1/4 tsp of each]
1/2 tsp kosher salt
1/2 tsp baking powder

1.  Preheat oven 350ºF. Line a 9x13 baking dish with parchment paper, leaving an overhang on two sides.  Press the paper into the corners of the pan and lightly grease the paper with butter.

2.  Melt the 2 sticks of butter in a non-stick saucepan over medium-low heat; do not boil.  Remove from the heat and let cool slightly.  Add the sugar, eggs and vanilla to the saucepan and stir with a wooden spoon until combined.

3.  Add the cocoa, flour, cinnamon, chili powder, salt and baking powder and mix until smooth.  Spread the batter in the prepared pan and bake until a toothpick inserted in the middle comes out fudgy, 20 to 25 minutes.  Cool in the pan on a rack, then use the parchment paper to lift out the brownies before slicing.


Source: Food Network http://www.foodnetwork.com/recipes/aaron-sanchezs-mexican-brownies-recipe/index.html

Review/Suggestions:

  • Yes, it calls for 2 sticks of butter.  I am inclined to try substituting unsweetened applesauce for one stick to decrease the fat and calories.  Because it was the first time making this, the only substitution I did make was with the sugar.
  • Unfortunately because I decreased the amount of Splenda equivalent (1cup = 2 cups of real sugar) to only a heaping 1/2 cup of Splenda, it changed the texture.  So next time would also go with the full 1 cup.  Yes, sometimes no matter what, texture or moistness will be affected.  Every once in a while there is a flip side to making desserts diabetic-friendly.
  • When I went to the mexican market, I asked about the canela cinnamon.  It is no different than regular cinnamon.  Needless to say no need to buy.
  • After reading several reviews, two things were consistently mentioned: the baking time was not long enough and both chili powder and cayenne should be used.  Using my oven thermometer, I knew my oven was accurate.  I still set the time for 15 minutes (as most baked goods tend to cook quickly due to the AccuBake oven).  Sure enough it was done.  And using both spices really did give it that nice "bite/kick" at the end.
  • So if you're looking for an easy dessert to make for Cinco de Mayo, this one will definitely work.
Ok, made a second batch the following day and did not alter any of the existing ingredients (yes, used all 2 cups of sugar).  What a difference!  They baked beautifully, were fudgy and still had that "bite/kick" afterward.  So lesson learned - this particular recipe does not do well with sugar substitution and decreased amount.

In counting the carbs for a healthy Cinco de Mayo meal - Chicken Taco Salad, Pico de gallo, Skinny Guacamole, and homemade salsa you could still have 1 to 2 brownie bites.  Just make sure to forego the tortilla chips.

Friday, April 27, 2012

Penne with Roasted Asparagus and Balsamic Butter

As soon as I saw this recipe, it was definitely a "gotta try" and "oh wait, let me add this and this and ....."

Serves - 4 [actually can serve 6]
Preparation Time: 10 minutes
Cooking Time: 30 minutes

1 pound asparagus
1 Tblspn olive oil
2 tsp salt
1/2 tsp fresh-ground black pepper
1/2 cup plus 2 Tblspn balsamic vinegar
1/2 tsp brown sugar [used Splenda blend brown sugar]
1 pound penne
1/4 pound butter, cut into pieces [used Benecol]
1/3 cup grated Parmesan cheese, plus more for serving

1.  Heat oven 400ºF.  Snap the tough ends off the asparagus and discard them.  Cut the spears into 1-inch pieces.  Put the asparagus on a baking sheet and toss with the oil and 1/4 tsp each of the salt and pepper.  Roast until tender, about 10 minutes.

2.  Meanwhile, put the vinegar in a small saucepan.  Simmer until 3 Tblspn remain.  Stir in the brown sugar and remaining 1/4 tsp pepper.  Remove from the heat.

3.  Cook the penne in a large pot of boiling, salted water until just done, about 13 minutes.  Drain the pasta and toss with the butter, vinegar, asparagus, Parmesan, and the remaining 1-3/4 tsp salt.  Serve with additional Parmesan.

Nutrition Facts based on Serves 6 with each serving as follows:


Note: though total carbs for Dreamfields Pasta is 41g, after you subtract the Dietary Fiber & protected (non-digestible carbs), the digestible carbs is only 5g.


Source: Food & Wine http://www.foodandwine.com/recipes/penne-with-roasted-asparagus-and-balsamic-butter

Review/Suggestions:

  • Even though it's not until Step 3 for cooking the pasta, word to the wise start it first.  By the time the water finally comes to a boil, you can easily prep and put the asparagus in the oven to roast, as well as simmering the vinegar.
  • Ok, the original recipe states it's vegetarian.  Either way, the baby bella crimini mushrooms were a great addition.
  • I also added 2 cups shredded chicken.
  • One of the tips the recipe offered - adding toasted nuts (pine nuts, hazelnuts or walnuts).  I think this dish would really be good with the pine nuts.  Unfortunately didn't have any - next time.
  • The other tip - if asparagus is not in season, you can substitute using roasted broccoli - cutting them into small spears, tossed with 2 Tblspn oil and salt & pepper and roast for approximately 15 minutes.
  • This recipe truly lends itself to any adaptations you can think of.
  • As for the Nutrition Facts - I was unable to adjust using the Benecol - which is healthier with the plant sterols [shown to lower cholesterol]
  • I only used 1 tsp of salt, so the sodium would adjust to 603mg.

Tuesday, April 24, 2012

Cape Cod Soft Molasses Cookies

If you love soft, chewy and spicy cookies, these are the ones for you.  And the secret to that "spice" - ground pepper.

Yield:  approximately 33 cookies
Preparation Time: 15 to 25 minutes
Baking Time: 8 to 10 minutes

3/4 cup (12 Tblspn) butter
1 cup granulated sugar [used 1/2 cup Splenda Blend per conversion chart]
1/2 tsp salt
2 tsp baking soda
1 large egg
1/3 cup molasses
2-1/4 cup All-Purpose flour
1/3 cup traditional or quick rolled oats
1/2 cup crystallized ginger, finely diced
1 tsp grated fresh ginger, or to taste
heaping 1/2 tsp ground cinnamon
1 tsp ground ginger
1 tsp ground allspice or ground cloves
1/4 tsp ground black pepper, optional
1 tsp espresso powder, optional; for depth of flavor and added color
1/3 to 1/2 cup granulated sugar or coarse white sparkling sugar, for coating

1.  Preheat oven 350ºF.  Lightly grease (or line with parchment) two baking sheets.

2.  In a large mixing bowl, beat together the butter, sugar, salt, and baking soda until well combined.

3.  Beat in the egg, and then the molasses, scraping the sides and bottom of the bowl to blend in any sticky residue.

4.  Add the flour, oats, crystallized ginger, fresh ginger, spices, and espresso powder.  Mix just until thoroughly combined.

5.  Scoop the sticky dough into 1-1/2" balls; a tablespoon cookie scoop works well here.

6.  Roll the balls in sugar (either granulated or coarse), if desired.  This is easily done by sprinkling the sugar into a 8" cake pan, and dropping the stick dough into the pan.  Shake the pan to coat the dough balls with sugar.

7.  Space the cookies on the prepared baking sheets, leaving about 2" between them.

8.  Bake the cookies for 8 to 10 minutes.  The centers will look soft and puffy; that's OK.  Cookies baked for 8 minutes will be VERY soft; bake them for 10 minutes, they'll be firmer.

9.  Remove them from the oven, and cool right on the pan; or transfer to a rack to cool.  To maintain soft texture, store at room temperature once cookies are completely cool.


After running a Nutritional analysis, here are the Nutrition Facts:
Calories - 82                               Sodium - 133mg
Calories from Fat - 37                 Total Carbs - 10.3g
Total Fat - 4.1g                               Sugar - 3.6g
    Saturated Fat - 2.5g                  Protein - 1.1g
Cholesterol - 15mg

Source:  King Arthur Flour - http://www.kingarthurflour.com/recipes/cape-cod-soft-molasses-cookies-recipe

Review/Suggestions:

  • Ok, you know me, adjust recipe to make diabetic-friendly.  So first switch - used Splenda Blend and per the conversion chart only needed 1/2 cup.
  • Used Allspice and omitted the pepper.  [Due to a friend's food allergy].  Will try this recipe again using the pepper to see how it changes the flavor.
  • Definitely used the espresso powder.
  • Definitely skipped Step 6 - I know it would add to the flavor, but don't need to add to the blood sugar.
  • Used my tablespoon cookie scoop and another small spoon to get the batter out of the scoop and onto the baking sheet.
  • Baked them for 9 minutes - went with semi-soft slightly firm.


Roasted Cod, Tomatoes, Orange & Onions

Ok, I have to admit that I wasn't too sure how onions would taste with cod.  Well, now I know - fabulous!

Serves - 4  /  Serving Size - 1 fillet and 1/4 of the citrus-tinged tomatoes & onions
Preparation Time: 10 minutes
Cooking Time: 55-60 minutes

1 pound ripe but firm small round or plum tomatoes, cut into 1/2 inch thick wedges
2 medium yellow onions, cut into 1/4 inch thick wedges
1 Tblspn finely slivered orange zest*
1 Tblspn extra-virgin olive oil
1 Tblspn chopped fresh thyme leaves, plus sprigs for garnish
1/2 tsp kosher salt, divided
Freshly ground pepper, to taste
1 pound boneless, skinless cod or other thick cut, firm-fleshed fist, cut into 4 equal portions

* Use a vegetable peeler, remove 3 or 4 pieces of zest from a large orange.  Stack the pieces on top of each other and slice into 1/8" wide strips

1.  Preheat oven 400ºF.

2.  Combine tomatoes, onions, orange zest, oil and chopped thyme in a 3-quart glass or ceramic baking dish.  Sprinkle with 1/4 tsp salt and pepper; stir to combine.

3.  Roast, stirring occasionally, until the onions are golden and brown on the edges, about 45 minutes.  Remove from the oven.  Increase oven temperature to 450ºF.

4.  Push the vegetables aside, add fish and season with the remaining 1/4 tsp salt and pepper; spoon the vegetables over the fish.

5.  Return the baking dish to the oven and bake until the fish is opaque in the center, about 10 to 12 minutes.  To serve, divide the fish and vegetables among 4 plates and garnish with thyme sprigs.

Exchanges/Carb choices:  1-1/2 vegetable / 3 very lean meat / 1 fat / 1 carb serving
Calories - 160                        Sodium - 308mg
Total Fat - 5g                         Total Carbs - 11g   w/net Carbs - 9g
   Saturated Fat - 1g                    Dietary Fiber - 2g
   Monounsat Fat - 3g             Protein - 20g
Cholesterol - 43mg

Source: EatingWell http://www.eatingwell.com/recipes/roasted_cod_tomatoes_orange_onions.html

Review/Suggestions:

  • The only thing I would do differently is add the tomatoes at the same time adding the fish.  This way the tomatoes are more al dente than stewed.

Sunday, April 22, 2012

Orange Muffins

Just the name was enough to make me want to make these for dessert!

Yields - about 2 dozen muffins
Preparation Time: 20 minutes
Cooking Time: 20 minutes

For the Muffins:
1 cup milk [used buttermilk]
1/2 cup freshly squeezed orange juice
1/2 cup sour cream [used light sour cream]
2 large eggs
2 sticks (16 Tblspn) unsalted butter, melted
3-1/2 cups all-purpose flour [used 2-1/2 cups all-purpose & 1 cup white whole wheat
1 cup sugar [used 1/2 cup Splenda blend per conversion table]
1-1/2 Tblspn baking pwoder
1/2 tsp salt
Zest of 1 orange

For glaze:
1/4 cup freshly squeezed orange juice
1-1/2 cups confectioner's sugar [only used 1/3 cup and left a few without glaze]
1-2 tsp orange zest

1.  Preheat oven 350ºF.  Line 16 wells of a muffin pan (or pans) with paper liners.  In a medium mixing bowl, combine the milk, orange juice, sour cream, eggs and melted butter.  Whisk together to blend.

2.  In a large mixing bowl, combine the flour, sugar, baking powder, and salt.  Stir to blend.  Pour the wet ingredients into the dry ingredients and mix just until incorporated.  Fold in the orange zest with a spatula.

3.  Divide the batter evenly between the prepared muffin cups.  Bake about 18-20 minutes, or until a toothpick inserted in the center comes out clean.  Let cool in the pan 5-10 minutes, then transfer to a wire rack placed over a baking sheet.

4.  To make the glaze, combine the orange juice, confectioner's sugar, and orange zest in a small bowl.  Whisk together until smooth, adding more juice if necessary to achieve your preferred consistency.  Drizzle the glaze over the muffins while they are still warm.  Allow the glaze to set before serving.  Store in an airtight container.


Source:  Pinterest http://annies-eats.com/2010/04/16/orange-muffins/

Review/Suggestions:

  • Even though you are using orange juice and zest, I would still recommend adding some orange flavoring - between 1-2 tsp (depending on just how much 'orange flavor' you like).
  • Same goes for the glaze.
  • For the ones I didn't glaze, you can only faintly taste the orange.  My other taste tester said that the glaze did add to the orange taste, but it was still on the light side.  So, again if you want more 'orange' then add that orange flavoring.
  • Either way, these are definitely a "keeper!"


Panko-Crusted Chicken

Here's another version of fried chicken using Panko bread crumbs.

Serves - 4  /  Serving Size - 1 piece
Preparation Time: 15 minutes
Cooking Time: 40 minutes

Nonstick cooking spray
2/3 cup buttermilk
3/4 cup whole wheat or white panko
    (Japanese-style bread crumbs)
1/2 tsp dried oregano, crushed
1/2 tsp ground cumin
1/2 tsp smoked or regular paprika
1/4 tsp salt
1/8 tsp black pepper
4 small bone-in chicken breast halves, skinned [used boneless, skinless breasts]
    (1-1/2 to 1-3/4 pounds total)

1.  Preheat oven 375ºF.  Line a 15x10x1 inch baking pan with foil and coat foil with cooking spray; set aside.  Pour buttermilk into a medium bowl.  In another medium bowl combine panko, oregano, cumin, paprika, salt and pepper.

2.  Dip chicken pieces into buttermilk, allowing excess to drip off.  Coat chicken pieces in panko mixture and place, bone sides down, in prepared pan.  Coat tops of chicken pieces with cooking spray.

3.  Bake for 40 to 50 minutes or until chicken is tender and no longer pink (170ºF).  Do not turn chicken pieces during baking

Exchanges/Carb Choices: 0.5 starch / 3 lean meat / 1 carb choice
Calories - 184                                Sodium - 278mg
Total Fat - 3g                                 Total Carbs - 11g  w/net Carbs - 9g
   Saturated Fat - 1g                            Dietary Fiber - 2g
Cholesterol - 71mg                         Protein - 26g

Source: Diabetic Living Diabetes What To Eat, A Better Homes and Gardens Book

Review/Suggestions:

  • This recipe is as easy as it sounds.  The 20 minute prep time is a stretch to me.  You can easily get this prepped in 10 minutes.
  • Even though I've done another recipe with panko bread crumbs (Parmesan Chicken with garlic & herbs), it's just whichever one your taste buds are in the mood for.
  • Honestly, you can't go wrong with this one.

Friday, April 20, 2012

Quick & Easy: Blueberries with Lemon Cream

Today was just right for a light dessert.

Serves - 4  /  Serving Size - 1/2 cup each
Preparation Time:  10 minutes total

4 oz reduced=fat cream cheese (Neufchâtel)
3/4 cup low-fat vanilla yogurt [used Carbmaster @ only 4 carbs]
1 tsp honey
2 tsp fresly grated lemon zest
2 cups fresh blueberries

1.  Using a fork, break up cream cheese in a medium bowl.  Drain off any liquid from the yogurt; add yogurt to the bowl along with the honey.  Using an electric mixer, beat at high speed until light and creamy.  Stir in lemon zest.

2.  Layer the lemon cream and blueberries in dessert dishes or wineglasses.  If not serving immediately, cover and refrigerate for up to 8 hours.

Exchanges:  1 fruit  /  1 fat (saturated)
Calories - 156                       Sodium - 151mg
Total Fat - 7g                        Total Carbs - 19g  w/net Carbs - 17g
   Saturated Fat - 4g                   [not adjusted for the lower carb yogurt]
   Monounsat Fat - 0g                Dietary Fiber - 2g
Cholesterol - 22 mg              Protein - 6g

Source: The Eating Well Diabetes Cookbook by Joyce Hendly and the Editors of EatingWell

Review/Suggestions:

  • Kroger is the only grocery store where I have been able to find the low carb yogurt, which also happens to be their store brand.
  • Since I no longer have any of my cake decorating supplies, I found a tip on Pinterest for DIY pastry bag - place frosting (or in this case the lemon cream) in a zip-lock plastic bag.  Cut the tip = pastry bag.  Made piping the top easy.
  • A sprinkling of lemon zest added to the beautiful presentation.
  • As the recipe states you can use any fresh berries with this dessert.

Friday, April 13, 2012

Quick & Easy: Spice-Rubbed Salmon

For another completely different taste, you'll definitely LOVE this one!

Serves - 4  /  Serving Size - 1 fillet
Preparation Time:  10 minutes
Cooking Time: 4 to 6 minutes per 1/2" thickness

1 1-lb fresh or frozen skinless salmon fillets
Nonstick cooking spray
1 Tblspn coriander seeds, coarsely crushed* [used ground coriander]
1 Tblspn packed brown sugar [used 2 tsp Splenda Brown sugar blend]
1 tsp lemon-pepper seasoning
Lemon wedges (optional)
Fresh cilantro sprigs (optional)

1.  Thaw salmon, if frozen. Coat a shallow baking pan with cooking spray.  Preheat oven 450ºF.  Rinse fish; pat dry with paper towels.  Measure thickness of fish.  Place fish in the prepared baking pan.

2.  In a small bowl stir together coriander seeds, brown sugar, and lemon-pepper seasoning.  Sprinkle fish evenly with coriander seed mixture; use your fingers to press in slightly.

3.  Bake fish for 4 to 6 minutes per 1/2" thickness or until fish flakes easily when tested with a fork.

The original recipe also included a Tropical Rice:
    In a medium bowl stir together 2 cups hot cooked brown rice; 1 medium mango, seeded, peeled and chopped; 1 tablespoon snipped fresh cilantro; and 1 teaspoon finely shredded lemon peel.

*You can substitute 1 tablespoon sesame seeds (toasted if desired) and 1/4 teaspoon ground cumin for the crushed coriander seeds.

Exchanges/Carb Choices - 0.5 fruit  /  2 starch  /  3 lean meat  / 2 carb choices
Calories - 366                              Sodium - 155mg
Total Fat - 13g                              Total Carbs - 35g   w/net Carbs - 32g
   Saturated Fat - 3g                           Dietary Fiber - 3g
Cholesterol - 66mg                        Protein - 26g


Nutritional Analysis with substitution:
Calories - 353         Sodium - 154mg              Carbs - 32g


Source:  Diabetic Living Diabetes What to Eat, a Better Homes and Gardens Book

Review/Suggestions:

  • Since I had basmati rice and ginger, decided to substitute the Tropical Rice for the Carrot Ginger Rice.  The Nutrition analysis combined with this recipe is comparable to what is listed above.
  • I think next time I could easily get by with just 1-1/2 teaspoons of the ground coriander when preparing only two fillets.  Same goes with the brown sugar when prepping only two fillets - just use 1-1/2 teaspoons.
  • Also, for most recipes I don't pack the brown sugar.

Wednesday, April 11, 2012

Stuffed Chicken Cutlets with Potatoes

Here's a Passover-friendly dish that's not just for Passover.  Enjoy!

Serves - 8 to 10  /  Serving Size - 1 piece of chicken & 1/4 cup potatoes
Preparation Time: 25 minutes
Cooking Time: 45-60 minutes

3 Tblspn vegetable oil
1 small onion, chopped
2 cups Manischewitz Matzo Farfel
Pinch of salt & pepper
1/4 cup fresh cilantro, chopped (reserve 1 Tblspn for garnish)
2 cloves fersh garlic, chopped and divded
1 egg, beaten
3/4 cup Manischewitz Condensed Chicken Broth
1 pound dark meat chicken thigh cutlets [used boneless skinless breasts]
1/4 cup fresh lemon jice
1 lemon sliced into thin circles
2 tomatoes, sliced into thin circles
1 Tblspn extra virgin olive oil
2 large potatoes, sliced into 1/4-inch thick circles

1.  Preheat oven 375ºF.  In a pan, saute onion in vegetable oil until tender but not browned.  Add the Matzo Farfel and toast lightly.  Combine salt, pepper, cilantro, egg, broth, half of the chopped garlic and add to the farfel mixture.  Set aside to cool.

2.  Place the sliced potatoes in a greased 9" x 13" roasting pan to cover entire bottom.  Cut a slit at the thickest part of each chicken thigh with a sharp knife.  Stuff each chicken thigh with some of the stuffing mixture and lay seam down on top of the sliced potatoes.  Rub each chicken piece with the other half of the chopped garlic (then wash hands well) and sprinkle lemon juice over the entire roasting pan.  Then, place a piece of sliced lemon and 2 pieces of tomato on top of each stuffed cutlet.  Lastly, drizzle with a little olive oil and top off with a sprinkle of salt and pepper.

3.  Bake for 45 minutes to 1 hour or until chicken is no longer pink inside.  Garnish with remaining fresh cilantro and serve.

After running a Nutrition analysis, here are the Nutrition Facts:
Calories - 251                               Sodium - 109mg
   Calories from Fat - 85                Total Carbs - 25.g   w/net Carbs - 22.1g
Total Fat - 9.5g                                  Dietary Fiber - 2.9g
   Saturated Fat - 2.1g                        Sugar - 2.3g
   Trans Fat - 0g                             Protein - 17.0g
Cholesterol - 59mg

Source : Recipe on the Manischewitz Matzo Farfel container

Review/Suggestions:

  • Because we aren't big fans of dark chicken meat, I used boneless skinless chicken breasts.
  • If you can't find the Matzo Farfel, you can take regular matzo and break them into small pieces (about the size you use for stuffing).
  • Using a medium-sized bowl to mix the Matzo farfel mixture and the rest of the stuffing ingredients makes it easier to thoroughly combine instead of mixing it all in the pan.
  • Ok, using the dark meat would have given this a bit more flavor, but still the stuffing was pretty bland.  Next time I would add a few more herbs - Rosemary, Thyme, maybe some Oregano and definitely sprinkled some dill over the chicken.
  • Also, use more liquid than what it calls for as the chicken & stuffing together were a little on the dry side.  When I reheated this for a friend, I decided to spoon some more broth over the stuffing and chicken - made all the difference in the world.

Tuesday, April 10, 2012

Quick & Easy: Balsamic & Parmesan Roasted Cauliflower

Another great side that you can't go wrong with!

Serves - 4  /  Serving Size - 1 cup
Preparation Time: 10 minutes
Cooking Time: 25-35 minutes

8 cups 1-inch thick slices cauliflower florets (about 1 large head*)
2 Tblspn extra-virgin olive oil
1 tsp dried marjoram
1/4 tsp salt
freshly ground pepper to taste
2 Tblspn balsamic vinegar
1/2 cup finely shredded Parmesan cheese

1.  Preheat oven 450ºF.

2.  Toss cauliflower, oil, marjoram, salt and pepper in a large bowl.  Spread on a large rimmed baking sheet and roast until starting to soften and brown on the bottom, 15 to 20 minutes.  Toss the cauliflower with vinegar and sprinkle with cheese.  Return to the oven and roast until the cheese is melted and any moisture has evaporated, 5 to 10 minutes more.

Exchanges/Carb - 1 vegetable  /  1/2 lean meat  /  1-1/2 fat  /  1/2 carb serving
Calories - 149                               Sodium - 364mg
Total Fat - 10g                              Total Carbs - 10g   w/net Carbs - 6g
   Saturated Fat - 3g                           Dietary Fiber - 4g
   Monounsat Fat - 6g                   Protein - 7g
Cholesterol - 7mg

Source: EatingWell http://www.eatingwell.com/recipes/balsamic_parmesan_roasted_cauliflower.html

Review/Suggestions:

  • Didn't have any marjoram so checked online as to which herb I could sub - and the lucky herb was OREGANO.
  • To make clean-up easier, I lined the baking sheet with foil and sprayed with nonstick cooking spray.
  • *Their tip on preparing florets from a whole head of cauliflower really worked:  "Remove outer leaves.  Slice off the thick stem.  With the head upside down and holding the knife at a 45º angle, slice into the smaller steams with a circular motion - removing a "plug" from the center of the head.  Break or cut the florets into the desired size."
  • Talk about a tasty and healthy way to enjoy cauliflower!

Quick & Easy: Broccoli with Caramelized Onions & Pine Nuts

Ok, time to get caught up on side dishes.  This one I served with Easter dinner.  YUM!

Serves - 4  /  Serving Size - 3/4 cup
Preparation Time: 5 minutes
Cooking Time: 25 minutes

3 Tblspn pine nuts, or chopped slivered almonds
2 tsp extra-virgin olive oil
1 cup chopped onion, (about 1 medium)
1/4 tsp salt, or to taste [decreased probably to 1/8 tsp]
4 cups broccoli florets
2 tsp balsamic vinegar
freshly ground pepper to taste

1.  Toast pine nuts (or almonds) in a medium dry skillet over medium-low heat, stirring constantly, until lightly browned and fragrant, 2 to 3 minutes.  Transfer to a small bowl to cool.

2.  Add oil to the pan and heat over medium heat.  Add onion and salt; cook, stirring occasionally, adjusting heat as necessary, until soft and golden brown, 15 to 20 minutes.

3.  Meanwhile, steam broccoli until just tender, 4 to 6 minutes.  Transfer to a large bowl.  Add the nuts, onion, vinegar and pepper; toss to coat.  Serve immediately.

Exchanges/Carb - 1-1/2 vegetable  /  1 fat  /  1/2 carb serving
Calories - 102                           Sodium - 166mg
Total Fat - 7g                            Total Carbs - 9g   w/net Carbs - 6g
   Saturated Fat - 1g                      Dietary Fiber - 3g
   Monounsat Fat - 0g                Protein - 3g
Cholesterol - 0g

Source:  EatingWell http://www.eatingwell.com/recipes/broccoli_with_caramelized_onions_pine_nuts.html

Review/Suggestions:

  • To save even more time, you can always buy the already cut and packaged broccoli florets.  But for the price, I'm fine with cutting the broccoli.
  • Since I had pine nuts that needed to be used sooner than later (with later being more like having to pitch them), this recipe was a double plus.
  • By prepping the broccoli ahead of time, all I had to do was take the container from the fridge to the microwave.  Gotta love the microwave steamer - easy way to cook veggies while still retaining all their nutrients.
  • This recipe is definitely a new favorite way to prepare broccoli!

Friday, April 6, 2012

Sliced Baked Potatoes

A fun way to prep those spuds!

2 small baking potatoes
2 teaspoons olive oil
salt and lemon pepper
dash of paprika

1.  Preheat oven to 425ºF.  Line cookie sheet with foil and prep with nonstick spray.  Wash potatoes and slice almost all the way through.  You want to make sure that the slices are all still attached at the bottom of the potato.

2.  Drizzle with olive oil and your favorite potato seasonings [mine are listed above]

3.  Place on prepped cookie sheets and bake for approximately 40 minutes.


After running a Nutritional analysis, here are the Nutrition Facts
Calories - 168                             Sodium - 14mg
   Calories from Fat - 42              Total Carbs - 29.3g   w/net Carbs - 26.2g
Total Fat - 4.7g                                Dietary Fiber - 3.1g
   Saturated Fat - 0.7g                      Sugar - 1.6g
Cholesterol - 0mg                        Protein - 3.5g

Source: Pinterest http://pagesfoodblog.blogspot.com/2012/01/your-new-favorite-way-to-cook-potatoes.html

Review/Suggestions:

  • I read a suggestion of using a chop stick placed next to the potato.  This is suppose to act as a guard against you slicing completely through the potato.  For the most part it really did work.
  • I used really small yellow potatoes so it made slicing them (and not my fingers) a true test of my knife welding skills.  [Happy to report all fingers still intact!]

Restaurant-style Steak

This recipe states it debunks the theory that restaurant-style steaks are grilled.  Instead, to achieve that seared juicy perfection, a combination of skillet cooking followed by finishing in the oven is the secret.  Ok, I'm game to see if this claim is true.  [Spoiler alert - Claim is right on!]

Serves 2
Preparation Time: 10 minutes
Cooking Time: 15 minutes

2 8-oz filet mignons
4 tsp kosher salt
4 tsp freshly ground pepper
1 stick butter [used 2 tsp Benecol]
1 Tblspn olive oil
2 cloves garlic
1 Tblspn parsley, chopped
1 Tblspn thyme, chopped
1 tsp freshly grated lemon zest

1.  Take 1/2 stick of butter, softened and mix well with the peeled, chopped garlic, the chopped herbs, and the lemon zest.  Form into a log and refrigerate.  Generously season the filets with salt and pepper, approximately 1 teaspoon of seasoning per side.

2.  Heat the remainder of the butter (1/2 stick) and the olive oil in a cast iron skillet to a screaming hot temperature.  Preheat oven to 400ºF.  Sear the filets in a screaming hot pan for about 2-3 minutes per side, or until a nice brown crust has formed.  While the steak is searing, continue to spoon the residual butter in the pan on top of the meat while it's cooking.

3.  Once both sides are seared, place in the center of the oven for about 6-8 minutes, depending upon how thick your steak is.  In the last minute or cooking, take the log of compound butter and slice a thick piece to place on top.

4.  Your steak will be ready when it is approximately 135º in the center, or when you push lightly on the top center of the steak and it gently and slowly bounces back.  (Note, this is medium rare so adjust cooking time accordingly.)

After running a Nutritional analysis, here are the Nutrition Facts:
Calories - 373                                Sodium - 2577mg
   Calories from Fat - 221               Total Carbs - 4.9g   w/net Carbs - 3.1g
Total Fat - 24.5g                                 Dietary Fiber - 1.8g
   Saturated Fat - 6.9g                      Protein - 32.7g
   Trans Fat - 0g                               Cholesterol - 75mg

Source: Pinterest http://whitsamusebouche.com/2011/12/08/restaurant-style/

Review/Suggestions:

  • Alright, the very first thing I changed was the "1 stick of butter."  I probably mixed up 2 teaspoons of Benecol with the garlic and herbs and only used to garnish the steak when serving.
  • Second, I decreased the amount of kosher salt used.  Yes, you read the Nutrition Facts correctly on the sodium.  A little kosher salt goes a long way.  So if you can get by seasoning both steaks with only 1 teaspoon then all the better.
  • I did add approximately 1 tablespoon unsalted butter to the oil.  And yes, be prepared for the steaks to definitely splatter grease.  This is where the splatter screen really comes in handy.
  • Now, for the oven part - let's just say that I've never set off the smoke detector so many times for one meal!  You guessed it - after dinner I was cleaning the oven grates while the oven ran through the "self-cleaning mode."  Now, you might think that after all that I'd swear off this recipe.  To the contrary, the steaks were tender, moist and yes restaurant-style.  So, my thinking is next time before I place the cast iron skillet with the steaks in the oven, I'll pour out a majority of the oil/butter combination and loosely cover it with foil.
  • Believe me, this recipe really is worth trying once.  I leave it up to you to decide if it's worth the clean-up.  [My vote is a resounding "yes!"]

Wednesday, April 4, 2012

Carrot-Ginger Rice

For tonight's dinner decided to pair this with the Orange-Soy Salmon - the verdict: "a keeper" so made the blog!

Serves - 6
Preparation Time: 10 minutes
Cooking Time: 35 minutes

1 cup of basmati rice
2 cups chicken broth
2 tsp olive oil
1/2 sweet yellow onion, diced
2 carrots, peeled & grated
1 tsp fresh ginger, peeled & minced
1 clove of garlic, minced
Sea salt and freshly cracked pepper, to taste
Dash of cayenne pepper (or more if desired) [I omitted]
1/4 cup fresh cilantro, chopped

1.  Combine the rice and chicken broth together in a medium saucepan.  Bring to a boil over high heat then reduce heat to low, cover with a lid, and steam for 20 minutes.  Remove from the heat and let sit for 5 minutes before fluffing with a fork.

2.  While the rice is cooking, heat the olive oil in a skillet over medium heat.  Add the onion and cook for 5 minutes, stirring often, until tender.  Add the carrot, ginger, and garlic to the onions and cook, stirring constantly for 1-2 minutes.  Add the rice to the mixture along with the cilantro, sea salt, freshly cracked pepper, and dash of cayenne pepper.  Stir gently so all ingredients are well combined.  Serve immediately.

After running a Nutrition analysis, here are the Nutrition Facts:
Calories - 153                           Sodium - 271mg
   Calories from Fat - 20            Total Carbs - 28.2g   w/net Carbs - 27g
Total Fat - 2.2g                              Dietary Fiber - 1.2g
   Trans Fat - 0g                             Sugar - 1.7g
Cholesterol - 0mg                       Protein - 4.2g

Source: Pinterest http://www.fortheloveofcooking.net/2011/01/carrot-ginger-rice.html


Review/Suggestions:

  • Even though the directions state to start cooking the other items while the rice is cooking, wait until the rice is almost done.  Otherwise, everything else will be ready but the rice.
  • Next time I will use a wooden fork to stir this so the rice will stay nice and fluffy.
  • Hhmmm, so what can I pair this with again this week??!!!

Saturday, March 31, 2012

Quick & Easy: Queso Chicken Pasta

Talk about an easy dish to prepare and definitely can be considered a "comfort food" as well!

Serves - 4 to 6
Preparation Time: 20 minutes
Cooking Time: 20 to 30 minutes

8 oz penne pasta [used Dreamfields w/net carbs of 5g]
2 tsp vegetable oil
1 cup diced onion
2 cloves garlic, minced
1 jalapeno, minced
1/2 tsp cumin
1/4 tsp coriander
1 Tblspn flour
1-1/3 cup milk, 2% or higher [used skim milk]
1 tsp salt
3 Tblsp cream cheese [used reduced fat]
6 oz colby-jack cheese, divided [used Mexican style]
1/2 cup drained Ro*Tel tomatoes [used Hunt's fire-roasted]
2 cups cooked shredded chicken

1.  Heat oven to 350ºF and spray a medium casserole dish with non-stick spray.

2.  Cook the pasta according to the package directions, but reduce the cooking time by two minutes.

3.  In a medium pot heat the oil over medium heat.  Once it begins to shimmer add the onion, garlic and pepper.  Cook until they begin to soften, about three minutes.  Add the cumin, coriander and salt and cook for an additional two minutes, or until the spices become fragrant.

4.  Add the flour and cook for three minutes, stirring constantly, until all the flour is moist.  Gradually whisk in the milk and stir until smooth.  Bring the mixture to a simmer and allow to thicken.

5.  Turn off the heat and add the cream cheese and 4 oz of the shredded cheese and whisk until melted.  Stir in the Ro*Tel tomatoes.

6.  Pour the pasta into the prepared casserole dish, stir in the shredded chicken and sauce.  Top with the remaining shredded cheese.

7.  Bake 20 to 30 minutes, or until pasta is bubbly and the cheese has melted.  Let stand 5 minutes before serving.

From the Nutritional analysis I ran, the Nutrition Facts are as follows:
Calories - 363                           Sodium - 692mg
   Calories from Fat - 138          Total Carbs - 20g  w/net Carbs - 14.7g
Total Fat - 14.8g                            Dietary Fiber - 5.3g
   Saturated Fat - 7.4g                     Sugar - 3g
   Trans Fat - 0g                         Protein - 27.2g
Cholesterol - 91mg

Source: Pinterest - http://www.evilshenanigans.com/2010/06/queso-chicken-pasta/

Review/Suggestions:

  • Yes, you guessed it, I didn't have enough penne so used rotini.
  • By using the low-fat milk and reduced-fat cream cheese, this dish went from a rating of "high in saturated fats" to low.
  • I used a large, deep nonstick skillet and mixed the pasta and chicken in with the sauce before pouring into the casserole dish.
  • Because I was concerned this dish would be too spicy with the whole really large jalapeno I bought, I only used approximately a third of it - definitely could have used the entire jalapeno.  Of course, should I make this dish during the summer when the peppers are hotter, it may only need a half.  So guess I'll have to experiment and make this again - what a sacrifice, but oh so willing to do it!
  • My friend nor I could really taste the spices - so may increase the amount as well next time.  Don't get me wrong, this dish is still really creamy and good.

Wednesday, March 28, 2012

Pork Chops with Pear & Ginger Sauce

Oh My Goodness!!!  At the first bite, I knew this was going to be a regular!  It's also one of those times that I would have never thought to bring the assortment of ingredients together.

Serves - 4  /  Serving Size - 1 chop & sauce
Preparation Time: 15 minutes
Cooking Time: 30 minutes

4 4-oz boneless pork chops, 1/2" thick, trimmed
Salt & freshly ground pepper, to taste
2 tsp canola oil
3 Tblspn cider vinegar
2 Tblspn sugar [used 1 Tblspn Splenda Blend]
2/3 cup dry white wine
1 cup reduced-sodium chicken broth
1 firm, ripe pear, such as Bosc or Anjou, peeled, cored, cut lengthwise into eights
1 1-1/2" long piece fresh ginger, peeled & cut into thick julienne strips (1/4 cup)
6 scallions, trimmed and sliced into 1/2 inch lengths
2 tsp cornstarch mixed with 2 tsp water

1.  Season pork with salt and pepper.  Heat oil in a large nonstick skillet over medium-high heat.  Add pork and cook until browned and just cooked through, 2 to 3 minutes per side.  Transfer to a plate and cover to keep warm.  Pour off fat from the pan.

2.  Add vinegar and sugar to the pan; stir to dissolve the sugar.  Cook over medium-high heat until the syrup turns dark amber, 10 to 20 seconds.  Pour in wine (stand back, as the caramel may sputter) and bring to a simmer, stirring.  Add scallions and cook until the pears are tender, about 2 minutes more.  Add the cornstarch mixture and cook, stirring, until lightly thickened.  Reduce heat to low and return the pork and any accumulated juices to the pan; turn to coat with the sauce.  Serve immediately.

Exchanges/Carbohydrate: 1/2 fruit  /  1/2 other carb  /  3 lean meat  /  1 fat
                                                1 Carb serving

Calories - 237                           Sodium - 286mg
Total Fat - 5g                            Total Carbs - 13g  w/net carbs - 11g
   Saturated Fat - 1g                       Dietary Fiber - 2g
   Monounsat Fat - 2g                Protein - 23g
Cholesterol - 52mg

Source:  EatingWell - http://www.eatingwell.com/recipes/pork_chops_with_pear_ginger_sauce.html

Review/Suggestions:

  • If you only need to prepare two pork chops, then you can decrease the cooking time to 20 minutes.
  • My vinegar and sugar did not result in a dark amber color.  It was more a light color, but once the juices from the pork were added, it turned a nice rich color.  Really though big whoop.  You just can't go wrong with this one! 

Monday, March 26, 2012

Parmesan Chicken with Garlic and Herbs

Found this recipe on Pinterest - looked good so had to taste test it.  Another keeper!

Serves - 4  /  Serving Size - 1 chicken breast
Preparation Time: 10 minutes
Marinate: all day
Cooking Time: 30-40 minutes

4 boneless, skinless chicken breasts
2 tsp crushed garlic (garlic puree from a jar works well)
1/4 cup extra virgin olive oil
1/2 tsp poultry seasoning
1/4 cup whole wheat Panko bread crumbs
1/4 cup finely grated Parmesan cheese

1.  Combine crushed garlic, olive oil and poultry seasoning in a small pan and heat 1 minutes, until just warm.

2.  Trim all visible fat and membranes from chicken breasts, then make small crosswise slits about 1/2 inch apart down the length of teach chicken breast, being careful not to cut too far into the chicken.  (This helps the garlic and herb flavor penetrate the chicken more.)  Put chicken into a zip lock bag, pour heated oil over and marinate all day in refrigerator.

3.  When ready to cook, take chicken out of fridge and let it come to room temperature for a few minutes while you preheat the oven to 425ºF.

4.  Mix the bread crumbs and parmesan (if you want the mixture finer, you can place in a food processor and pulse a few times.)  Place mixture in a flat dish and dip each chicken breast into it, pressing on as much of the coating as you can.

5.  Place each chicken piece in a casserole dish sprayed with nonstick spray or olive oil.  Bake until chicken is firm and cooked through, approximately 30 to 40 minutes.  Then put under the broiler to brown more if desired.  Actual cooking time will depend on the thickness of your chicken breasts.

From the Nutritional Analysis I ran, here are the Nutrition Facts:
Calories - 361                          Sodium - 243mg
   Calories from Fat - 186         Total Carbs - 5.7g
Total Fat - 20.7g                          Sugar - 0.5g
   Saturated Fat - 4.9g                Protein - 36.2g
Cholesterol - 106mg

Source: Pinterest http://www.kalynskitchen.com/2005/11/parmesan-chicken.html

Review/Suggestions:

  • I had just purchased Panko bread crumbs, but not whole wheat variety.  Oh well.
  • I really think you could get by with just marinating for 4-5 hours, but entirely up to you.
  • The person who tried this recipe felt that 30 minutes was too long to bake the chicken breasts.  After 25 minutes (which was recommended) these weren't quite done.  Definitely took 30 minutes.
  • The Panko bread crumbs are crunchier, but they were still soft on the bottom.  Next time I would turn the breasts so the bread crumbs on both sides are crunchy.
  • Ok, just took a look at the site where I found this recipe and realize a couple of things I didn't do: First - go ahead and make the bread crumb mixture finer.  I thought it looked good as it was.  Second - use a baking sheet instead of a casserole dish (so why does it say place in a casserole dish?)  Ugh!  No wonder my bread crumbs didn't come out nice and crunchy!  Ok now I know for next time.

Sunday, March 25, 2012

Quick & Easy: Wholesome Cornbread

Oh, Yeah!!!  I'm a believer after having made this delicious cornbread tonight!

Servings - 9
Preparation Time: 10 to 15 minutes
Cooking Time: 25 to 30 minutes

1-1/4 cups yellow cornmeal
3/4 cup whole-wheat flour
3 Tblspn sugar [used Splenda blend]
1 tsp baking powder
1/2 tsp baking soda
1/2 tsp salt
1 large egg, lightly beaten
1-1/4 cups buttermilk
2 Tblspn canola oil

1.  Preheat oven 350ºF.  Coat an 8-inch square baking pan with cooking spray.

2.  Whisk cornmeal, flour, sugar, baking powder, baking soda and salt in a large bowl.  Whisk egg, buttermilk and oil in a separate bowl.  Add to the dry ingredients and stir until just combined.  Scrape the batter into the prepared pan, spreading evenly.

3.  Bake the cornbread until the top springs back when touched lightly, 25 to 30 minutes.  Let cool in the pan on a wire rack for at least 5 minutes.  Serve warm or at room temperature.

Exchanges/Carbohydrates:  1 starch  /  1/2 vegetable  /  1 lean meat  /  1/2 medium-fat meat  /  2-1/2 fat
1-1/2 carb serving
Calories - 164                        Sodium - 287mg
Total Fat - 5g                         Total Carbs - 27g   w/net Carbs - 24g
   Saturated Fat - 1g                    Dietary Fiber - 3g
   Monounsat Fat - 2g             Protein - 5g
Cholesterol - 22mg

Source: http://www.eatingwell.com/recipes/wholesome_cornbread.html

Review/Suggestions:

  • After reading the one review that comes up on the same page with the recipe, I also went with white whole-wheat flour.
  • Because I used the Splenda blend, I only used 2 Tablespoons.
  • I was happy to find a recipe that was fairly low in carbs for the serving size!
  • Definitely making this my "tried and true" recipe

Chili

With the change in weather, it just felt like a day for chili.  So as I keep experimenting with different recipes, this one is the best to date.

Serves - 6 to 7
Preparation Time: 10
Cooking Time: 30-45 minutes

1 pound ground beef [used the 80/20 ground beef]
1 large onion, chopped
2 cloves garlic, minced
2 cans (16 oz) Bush's Chili Beans, undrained [used the chili beans in mild sauce]
2 cups water
1 tsp chili powder (or to taste)
1/2 cup ketchup [used 1 can tomato paste]
1/2 tsp cayenne pepper or hot pepper sauce

1.  In a large non-stick skillet, cook beef until lightly browned.  Drain meat on paper towels to remove excess grease.  In the same skillet, add the onion and garlic and cook until soft.  Add the meat to the onion and garlic and cook for another 2-3 minutes.

2.  In a large pot, add the meat and the rest of the ingredients.  Mix well, simmer for 30 to 45 minutes.  Add salt and pepper to taste.

From the Nutrition Analysis I ran, here are the Nutrition Facts:
Calories - 221                           Sodium - 579mg
   Calories from Fat - 70            Total Carbs - 14.6g   w/net Carbs - 11.2g
Total Fat - 7.7g                             Dietary Fiber - 3.4g
   Saturated Fat - 3.1g                   Sugar - 5.6g
Cholesterol - 69mg                    Protein - 24g

Source:  Recipe on the label of the Bush's Chili Beans

Review/Suggestions:

  • Because of different levels of spicy/heat tolerance, I went with the mild sauce chili beans.  Bush's also has chili beans in medium and hot sauce.
  • Even with the mild sauce, I could tell it was going to be too spicy for everyone.  So I added 1 can of tomato paste which really took the spice level down - so much so that I did use the 1 teaspoon of chili powder and cayenne pepper.
  • Sorry, but I didn't grow up with celery in my chili (which the original recipe called for) so needless to say, I omitted it.
  • Even though the directions say you only need to let it simmer for 30 to 45 minutes, most cooks agree that the longer you let it simmer, the better the flavor.  I left mine on low simmer for at least 2 hours.
  • Now as for nutrition, the net carbs isn't bad at all.  But, and yes there's always a flip side, the cholesterol and sodium are high.  Again using the leanest ground beef will help decrease this.  Even better, use textured vegetable protein.  You can find this at Whole Foods and I've even seen it at Kroger.  I haven't checked Giant Eagle or Meijer, but I'm thinking they would carry it was well.  Believe me, unless you knew ahead of time that it was used in place of ground beef, you would not taste any difference.
  • Now I did see a different brand of chili beans with lower sodium, which I'll probably consider using next time.  

Friday, March 23, 2012

Quick & Easy: Boneless Pork Chops with Mushrooms & Thyme

Although this recipe serves two, you can easily double or triple it.  Your taste buds will love the nice change in these pork chops' flavor.  Again, as with all the other recipes that have made their way to this blog, it's a keeper!

Serves - 2  /  Serving Size - 1 pork chop & 1/2 of sauce
Preparation Time: 10 minutes
Cooking Time: 15 minutes

2 5-oz boneless, center-cut pork loin chops, trimmed & pounded to 1/4" thick
1/4 tsp salt
1/4 tsp freshly ground pepper
1 tsp extra-virgin olive oil
1 medium shallot, minced
1-1/2 cups sliced mushrooms (about 4 oz)
1/2 cup dry vermouth [substituted white cooking wine]
1 tsp Dijon mustard
1 tsp chopped fresh thyme

1.  Sprinkle pork chops with salt and pepper.  Coat a large nonstick skillet with cooking spray and place over medium heat.  Add the pork chops and cook until browned on both sides and cooked through, 2 to 3 minutes per side.  Transfer to 2 serving plates; tent with foil to keep warm.

2.  Swirl oil into the pan, add shallot and cook, stirring until soft, about 30 seconds.  Add mushrooms and cook, stirring occasionally, until they soften and begin to brown, about 2 minutes.  Add vermouth and cook for 15 seconds.  Stir in mustard, thyme and any juices that have accumulated from the pork; cook until the sauce is thickened and slightly reduced, 1 to 2 minutes more.  Spoon the sauce over the pork chops and serve immediately.

Exchanges: 1 vegetable  /  4 medium-fat meat
Calories - 298                            Sodium - 382mg
Total Fat - 13 g                          Total Carbs - 4g
   Saturated Fat - 6g                        Dietary Fiber - 1g
   Monounsat Fat - 6g                 Protein - 26g
Cholesterol - 77mg

Source: http://www.eatingwell.com/recipes/boneless_pork_chops_with_mushrooms_thyme.html

Review/Suggestions:

  • I put both chops in a large zip-lock bag and used a meat mallet to flatten them.  The tip suggested putting the chops between two sheets of plastic wrap.  Sorry, but too easy for the chop to go shooting out one side when you pound it - no matter how you try to seal the edges of the plastic wrap.
  • I cooked the chops for an additional 2-3 minutes as the juices from the chops still ran pink instead of clear.
  • I placed both chops on a serving platter so I only had the platter to tent with foil.
  • Since I didn't have vermouth, I checked online as to what substitution I could use.  White grape juice, dry white wine or as the recipe suggested unsweetened apple juice were recommended.
  • I honestly do not know how this sauce was suppose to thicken as there was no dry ingredient added to absorb the liquid.  I just continued to let the sauce simmer and reduce down.